The secret to safely enjoying Riverdale Park isn’t just wearing a helmet; it’s understanding the hill’s unique physics and your body’s reaction to the intense climb-and-slide cycle.
- The central ice track is a high-speed luge run that eliminates steering and dramatically increases the risk of fractures.
- Your choice of sled (steerable vs. mat) is the single biggest factor in maintaining control and avoiding collisions.
Recommendation: Treat your tobogganing trip like a mini-expedition. Plan for thermoregulation, choose your equipment wisely, and know when to bail out to avoid a trip to my emergency room.
text
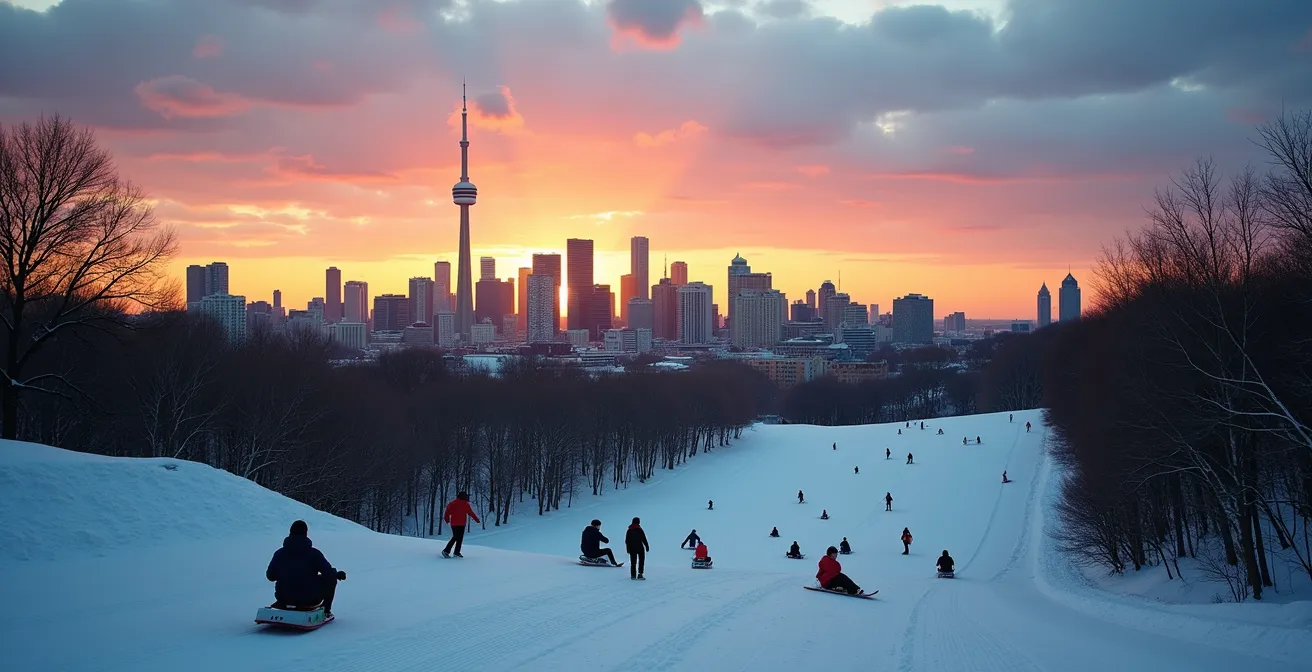
Every winter weekend, I see it from the ER: the walking wounded of Riverdale Park. A sprained wrist here, a cracked rib there, and the occasional concussion from a day of “fun” that went sideways—literally. As an emergency room nurse in Toronto, I love the joy that a snow day brings, but I also have a front-row seat to the consequences when that joy meets the city’s most notorious tobogganing hill. People know the basic advice: wear a helmet, look where you’re going. But that doesn’t explain why Riverdale sends us so many customers.
The truth is, tackling this hill isn’t about general winter safety. It’s about mastering a very specific environment. The steep grade, the sheer number of people, and the infamous ice channel that forms down the middle create a unique set of hazards. The biggest mistakes I see aren’t acts of spectacular recklessness; they’re subtle errors in judgment about equipment, timing, and even what you wear. People focus on the fun of the two-minute slide down, but they forget that the ten-minute climb back up is where the real physiological challenge lies.
But what if you could approach Riverdale with the insight of a risk-assessment pro? This isn’t a guide to tell you “don’t.” This is a guide to show you *how*. We’re going to break down the specific physics of the hill’s most dangerous feature, compare the gear that gives you control versus the gear that turns you into a projectile, and even discuss the critical layering mistake that can lead to hypothermia. We’ll turn a day of sledding into a masterclass in urban winter enjoyment, from the first slide to the last cup of hot chocolate.
This article breaks down everything you need to know to conquer Riverdale Park’s hill safely and make the most of your winter day out. Here’s a look at what we’ll cover so you can spend your time on the snow, not in a waiting room.
Summary: An ER Nurse’s Guide to Riverdale Park Tobogganing
- Why Does the Ice Track in the Middle Cause the Most Injuries?
- GT Snow Racer vs. Crazy Carpet: Which Offers Better Control?
- Day Sledding vs. Night Sledding: Which is Safer for Small Kids?
- The Layering Mistake That Makes You Sweat and Then Freeze
- Where to Get Hot Chocolate Near Danforth Avenue After Sledding?
- Why is a Clear Winter Morning Better Than a Hazy Summer Afternoon?
- Riverdale Park East vs. Christie Pits: Which Has the Best Sunset Vibe?
- Urban Detox: How to Maximize the Mental Health Benefits of a Nordic Spa Cycle?
Why Does the Ice Track in the Middle Cause the Most Injuries?
That slick, shiny groove running down the center of the hill might look like a fast-track to fun, but in the ER, we call it the “fracture funnel.” This isn’t just snow packed down; it’s a luge run formed by repeated melting and refreezing, creating a near-frictionless surface. The primary danger is the total loss of control. Once your sled locks into this ice groove, you can’t steer, you can’t brake, and your path is determined entirely by the track. You become a passenger, not a pilot. This is the classic mechanism of injury for high-speed collisions with other people, trees, or the hay bales at the bottom.
The speed you gain on the ice is deceptive. It significantly increases the kinetic energy you need to dissipate upon impact, turning a minor bump into a major injury. In fact, 32% of tobogganing injuries in Canada are fractures, and I see more than my fair share of them from incidents where someone couldn’t escape the ice track. The key is to stay off it, but if you get caught, you need an escape plan. The worst thing you can do is ride head-first, as this offers zero protection and is a leading cause of concussions.
Knowing when and how to bail out is a critical skill. It feels counterintuitive to ditch a sled that’s going too fast, but it’s the one move that can save you a trip to the hospital. Here are the techniques we wish everyone knew:
- Recognize the Commitment Point: This is about one-third of the way down the hill, where your sled locks into the ice. If you feel you’re going too fast before this point, it’s time to act.
- Roll, Don’t Steer: Your instinct will be to try and steer out of the groove. Don’t. It’s ineffective and can cause the sled to flip. Instead, roll sideways off the sled.
- Protect Your Head: As you roll, bring your arms up to cover your head and neck.
- Scramble to Safety: Once you’ve stopped, immediately move to the side of the hill to avoid being hit by the person behind you.
GT Snow Racer vs. Crazy Carpet: Which Offers Better Control?
When you’re standing at the top of Riverdale’s steep slope, the piece of plastic or metal under you is the only thing separating a controlled descent from a chaotic yard sale. From my perspective, your choice of sled is the single most important safety decision you’ll make. It’s a choice between having a steering wheel and a brake, or having neither. The debate between a steerable sled like a GT Snow Racer and a simple plastic sheet like a Crazy Carpet isn’t about which is more “fun”—it’s about which gives you agency over your own safety.
A Crazy Carpet is light, fast, and easy to carry, but on a packed or icy hill, it has zero directional control. It spins, it veers, and it essentially turns the rider into an unguided projectile. Trying to stop involves dragging your hands and feet, which is a great way to catch a hidden rock and end up with a sprain or fracture. The GT Snow Racer, with its responsive skis, steering wheel, and foot brake, allows a rider to actively navigate around obstacles and people, and to control their speed on the descent.
This table breaks down the crucial differences from a safety standpoint. As you can see, one is a vehicle, and the other is a liability.
| Feature | GT Snow Racer | Crazy Carpet |
|---|---|---|
| Steering Control | Full steering wheel with responsive skis | No steering capability |
| Braking System | Metal foot brake for controlled stops | No braking mechanism |
| Center of Gravity | Low and stable with seated position | Variable and unpredictable |
| Ice Performance | Maintains directional control on ice | Becomes unguided projectile |
| Safety Features | Ski stopper if rider falls off | None |
While any sled can be dangerous, having the ability to steer and brake fundamentally changes the risk equation. It empowers you to react to the unpredictable environment of a crowded public hill. Choosing a sled without these features is like driving a car with no steering wheel—you’re just along for the ride, and hoping for the best.
Day Sledding vs. Night Sledding: Which is Safer for Small Kids?
For little kids, the magic of sledding under the stars is powerful, but the risks multiply exponentially after the sun goes down. My answer to this question is unequivocal: day sledding is the only safe option for young children. The data is stark; Canadian emergency department information shows that 43.6% of tobogganing injuries occur in children aged 5-9. This age group lacks the judgment and reaction time to handle high-speed situations, especially when visibility is low.
The problem with night sledding isn’t just the general darkness. The park lighting at Riverdale is designed for walking paths, not for illuminating hazards hurtling towards you at 30 km/h. At night, these lights create long, deceptive shadows that can completely hide bumps, icy patches, or even a fallen sledder in your path. This is especially true after 4 p.m. in the winter, when any snow that melted during the day rapidly refreezes into slick, nearly invisible sheets of ice.
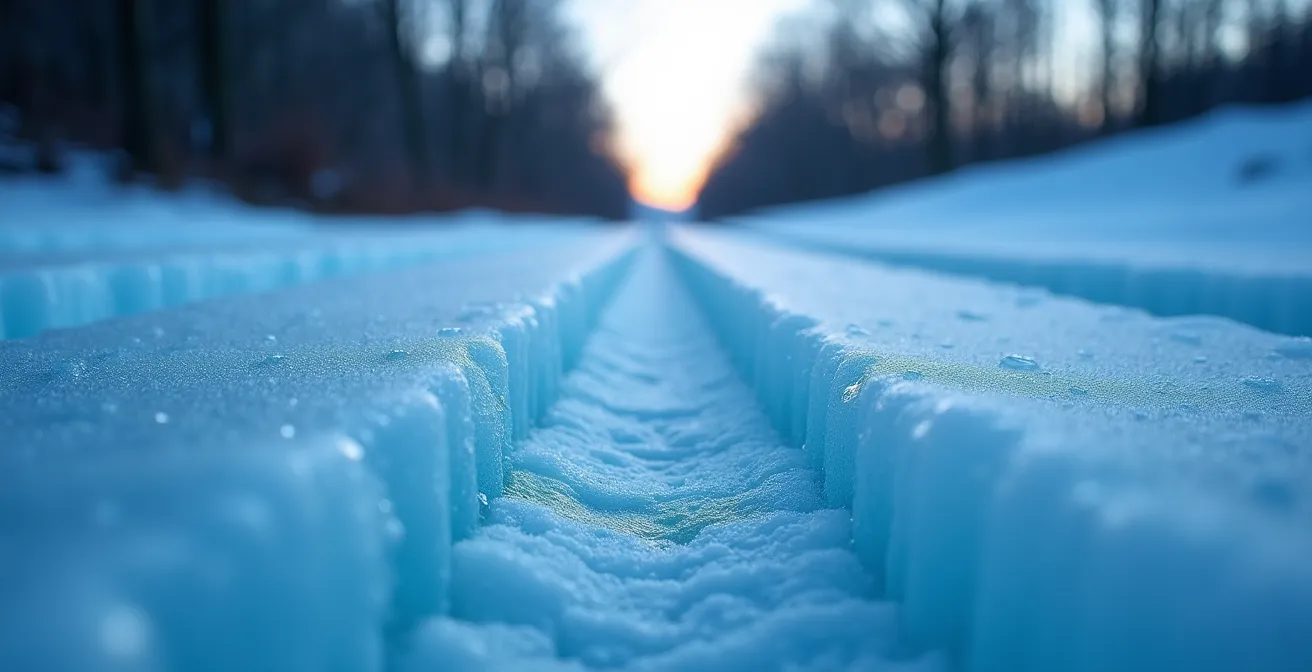
As the image above shows, the texture of the hill changes dramatically at dusk. What looks like a smooth run can be a patchwork of treacherous ice. For kids, whose field of vision is already lower to the ground, spotting these dangers in time is nearly impossible. According to safety experts at Parachute Canada, hills chosen for children should be less than 30 degrees steep and always navigated with constant adult supervision. At night, that supervision becomes ineffective because you can’t see what you’re supervising.
The Layering Mistake That Makes You Sweat and Then Freeze
One of the most common but least understood risks on the toboggan hill isn’t a traumatic injury, but a physiological one: the sweat-and-freeze cycle. I’ve treated patients for mild hypothermia on days that weren’t even that cold. The mistake isn’t under-dressing; it’s improper layering for the unique physical demands of sledding. Research on winter activity shows the climb-descent cycle creates a major thermoregulation challenge. You engage in intense cardiovascular effort climbing the steep hill, which causes heavy sweating. Then, you sit on a sled for a fast, windy descent, and that sweat rapidly cools your body.
When your base layer is damp—especially if it’s cotton—it loses all insulating properties and actively pulls heat from your body. This can quickly drop your core temperature, leading to shivering, exhaustion, and impaired judgment, which in turn increases your risk of an accident. The goal is not just to stay warm, but to stay dry from the inside out. This requires a strategic layering system designed for stop-and-go activity.
Here is the proper, ER-nurse-approved layering protocol to manage the sweat-and-freeze cycle:
- Base Layer: Absolutely no cotton. Wear a moisture-wicking material like merino wool or a synthetic polyester blend. Its only job is to move sweat away from your skin.
- Mid Layer: This is your insulation. A fleece or light down vest is perfect because it’s easy to remove. The key is to take this layer off for the climb up and put it back on at the top for the ride down.
- Outer Shell: A windproof but breathable jacket is essential. It blocks the wind chill on the descent but allows some of the vapor from your body to escape.
- Kid Strategy: Two-piece snowsuits are far better than one-piece suits for this reason. You can take the jacket off during the climb so they don’t overheat, then zip them back up at the top.
- Pro Tip: Carry a small, light backpack. Its sole purpose is to hold the layers you shed on the way up.
Where to Get Hot Chocolate Near Danforth Avenue After Sledding?
After a few hours of climbing and sliding, the post-tobogganing hot chocolate isn’t just a treat; it’s a crucial part of the recovery process. Warming up from the inside helps restore your body temperature and morale. Luckily, Riverdale Park’s proximity to the Danforth and Broadview offers some of Toronto’s best options. The unofficial headquarters for many sledders is Rooster Coffee House at 479 Broadview Avenue. Its location near the park’s main entrance and its laid-back attitude towards snow-covered patrons make it the perfect, convenient pit stop. Grabbing a rich hot chocolate there is a classic Riverdale experience.
But for those who want to level up their post-sledding game, I present the “ER Nurse’s Trunk Party” method. It requires a bit of planning but delivers maximum coziness and convenience, especially with tired kids. Instead of trekking to a cafe, you bring the cafe to your car. It’s the ultimate self-sufficient move that guarantees a perfect end to the day, without the lines or the hassle of dragging wet gear into a shop.
Here’s your guide to creating the perfect DIY warming station:
- The Thermos is Key: Make your hot chocolate at home and pour it into a high-quality, pre-warmed thermos that will keep it piping hot for hours.
- Strategic Parking: Park on a side street just off Broadview Avenue. This gives you easy access to both the hill and your vehicle.
- Set Up Your Station: Keep a kit in your trunk: cups, marshmallows, a couple of warm blankets, and maybe some cookies.
- Create a Warming Zone: Use your car as a warming hut for short breaks between sledding sessions. It’s a great way to help little ones (and big ones) regulate their temperature.
- Embrace the Danforth: For a unique Toronto twist, pack an extra thermos with a Greek-inspired warm beverage. A quick stop at one of Greektown’s iconic bakeries on the Danforth before you hit the hill can provide some amazing, non-traditional options.
Why is a Clear Winter Morning Better Than a Hazy Summer Afternoon?
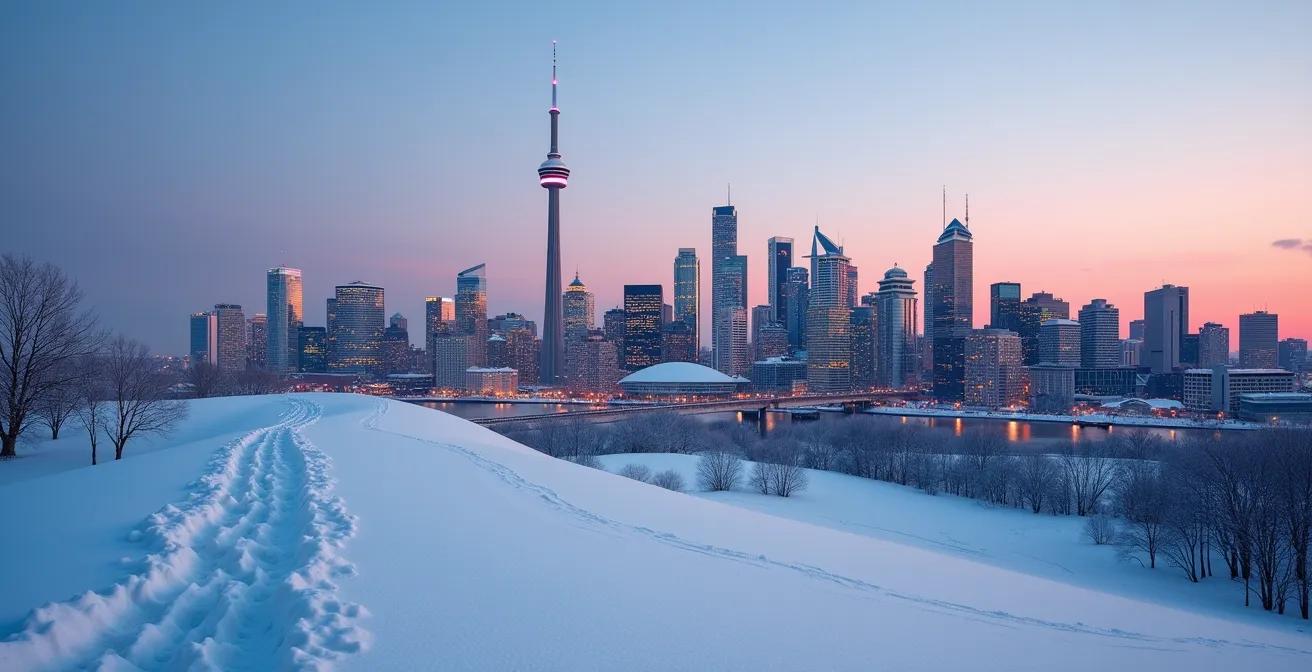
While the main draw of Riverdale Park in winter is the thrill of the hill, its secondary—and arguably more breathtaking—attraction is the view. The park’s elevated position offers one of the most iconic panoramic vistas of the Toronto skyline. But why does that same view look so much more crisp and dramatic in January than it does in July? The answer is simple atmospheric science. Cold winter air is your friend when it comes to urban photography and sightseeing.
According to an analysis by local real estate blog Urbaneer, the exceptional clarity of the winter view is due to two main factors. First, cold air holds significantly less moisture than warm, humid summer air. This low humidity means there are fewer water droplets in the atmosphere to scatter light and create haze. Second, the colder, denser air often traps less particulate matter and pollution, leading to a clearer line of sight. The result is a skyline that appears sharper, closer, and more detailed.
This effect is most pronounced during the winter’s “golden hour”—the period shortly after sunrise or before sunset. The low-angle sunlight rakes across the downtown buildings, creating long, dramatic shadows and making the architecture pop in three dimensions. In contrast, a hazy summer afternoon often produces flat, washed-out lighting that robs the skyline of its depth and character. A clear winter morning from Riverdale Park isn’t just a view; it’s a high-definition experience.
Riverdale Park East vs. Christie Pits: Which Has the Best Sunset Vibe?
In Toronto, the debate over the best tobogganing hill often comes down to two titans: Riverdale Park East and Christie Pits. While both offer great sledding, they provide fundamentally different sunset experiences. Choosing between them is less about which hill is “better” and more about what kind of vibe you’re looking for. From my point of view, it’s about choosing your therapy: do you want immersive, direct-to-the-eyeballs color, or do you want a grand, architectural light show?
Christie Pits is a west-facing bowl. This means you get the full, direct sunset experience. You are immersed in the light as the sun dips below the horizon in front of you. It’s an intense, personal, and classic sunset vibe, popular with the downtown student and park-hang crowd. Riverdale Park East, on the other hand, faces east, looking away from the setting sun. This might seem like a disadvantage, but it’s actually its greatest strength. Instead of the direct sunset, you are treated to the alpenglow on the downtown skyline. The buildings catch the last rays of light, turning pink, orange, and purple against the darkening eastern sky.
This table compares the key aspects of the sunset experience at each location, helping you pick the perfect backdrop for your winter evening.
| Aspect | Riverdale Park East | Christie Pits |
|---|---|---|
| View Direction | East-facing (skyline views) | West-facing (direct sunset) |
| Sunset Effect | Alpenglow on downtown buildings | Direct sunset immersion |
| Hill Profile | Wide, steep with skyline backdrop | Bowl-shaped, contained experience |
| Crowd Type | Leslieville/Riverdale families | Downtown students, park-hang crowd |
| Transit Access | Broadview subway + walk | Christie subway direct access |
Key Takeaways
- Control is everything: A steerable sled with a brake is non-negotiable for the steep, crowded conditions at Riverdale Park.
- Master your layers: The “climb-descent” cycle requires a moisture-wicking base layer and removable mid-layers to prevent sweating and then freezing.
- Respect the hill’s specific dangers: The central ice track and poor nighttime visibility are the primary causes of serious injury, especially for children.
Urban Detox: How to Maximize the Mental Health Benefits of a Nordic Spa Cycle?
After a day of navigating crowds, cold, and adrenaline, your body and mind need to decompress. What most people don’t realize is that their tobogganing adventure at Riverdale has already primed them for a perfect recovery. The physical pattern of tobogganing—intense cardiovascular effort climbing the hill followed by rapid cold-wind exposure on the descent—mimics the physiological stress of a Nordic spa cycle. You’ve already done the “hot” and “cold” parts; now it’s time for the “rest” to complete your urban detox.
Instead of just heading home to the lingering stress of the TTC commute and urban noise, you can consciously complete this thermal cycle to maximize the mental health benefits. The goal is to shift your nervous system from a state of high alert (sympathetic) to one of rest and recovery (parasympathetic). This is where simple, mindful techniques can make a world of difference. It’s about countering the overstimulation of the city with intentional silence and focused breathing.
One of the most effective tools for this is box breathing, a simple technique used to regulate the nervous system. It’s particularly powerful when transitioning between extreme temperatures, like getting into a cold car after being outside, or stepping into a warm house. Practicing this can help you leverage the physical exertion of the day into a profound sense of calm.
Action Plan: The Post-Sledding Cooldown Cycle
- Preparation: Before you even leave the park, take a moment. Practice box breathing: inhale for 4 counts, hold for 4, exhale for 4, and hold for 4.
- Entry Phase (Your Car/Home): As you get into your warm car or walk into your home, continue the box breathing. Consciously note the transition from cold to warm.
- Immersion (The Warmth): Once you’re settled in the warmth, maintain the steady breathing pattern for 2-3 minutes. Focus on releasing the physical tension from your shoulders and jaw.
- Stress Release: Use the warmth and quiet to consciously let go of city-specific stress—the noise, the crowds, the commute. Visualize it dissolving with each exhale.
- Rest Period: Finally, embrace a few minutes of mindful silence. No phone, no music. Just allow your body and mind to absorb the benefits of the cycle: exertion, cold, warmth, and now, rest.
Now that you have the knowledge to tackle the hill safely and recover effectively, the next step is to put it into practice. Plan your trip, choose your gear wisely, and embrace one of Toronto’s most thrilling winter traditions with confidence.